前回SSLなしで構築し、この状態でも運用はできるが、通信をよりセキュアにするためSSL/TLSを設定する。ここでは、Certbotの無料サーバー証明書を導入し、無料で暗号化通信が行えるようにする。


環境条件
mod_sslインストール
mod_sslが導入済みかどうかの確認。
# httpd -M
・・・・
ssl_module (shared)
・・・
#ssl_moduleが一覧に表示されていれば導入済み
無ければインストール。
# dnf -y install mod_ssl
Certbotパッケージをインストール
さくらのVPSは初めからEPELリポジトリが使用可能になっているので、EPELリポジトリに含まれるCertbotパッケージをインストールする。
# dnf -y install certbot
Complete 完了
サーバー証明書の作成
Web サーバーが稼働していない場合
ファイアウォールのHTTP接続ポート80番が許可されてなければ
#http80番ポートを接続許可する
firewall-cmd --add-service=http --permanent
success
# firewall-cmd --reload
success
–standaloneオプションで実行
# certbot-auto certonly --standalone -d mail.example.com
Web サーバーが稼働している場合
certbot-autoコマンド”–webroot”で実行
certbot-auto certonly --webroot -w /var/www/html -d example.com -d mail.example.com -d www.exsample.com
-w [ドキュメントルート]
-d [証明書を取得したい FQDN]
証明書を取得したい FQDN が複数ある場合は、-d [FQDN] を複数指定
.....
#依存関係ファイルのインストールが始まる
Is this ok [y/N]: y
.....
Complete! #インストール完了
.....
# 初回のみ対話型のウィザードが起動
Enter email address (used for urgent renewal and security notices)
(Enter 'c' to cancel): info@example.com #メールアドレスを入力
- - - - - - - - - - - - - - - - - - - - - - - - - - - - - - - - - - - - - - - -
Please read the Terms of Service at
https://letsencrypt.org/documents/LE-SA-v1.2-November-15-2017.pdf. You must
agree in order to register with the ACME server at
https://acme-v02.api.letsencrypt.org/directory
- - - - - - - - - - - - - - - - - - - - - - - - - - - - - - - - - - - - - - - -
(A)gree/(C)ancel: A #利用条件に同意する
- - - - - - - - - - - - - - - - - - - - - - - - - - - - - - - - - - - - - - - -
Would you be willing, once your first certificate is successfully issued, to
share your email address with the Electronic Frontier Foundation, a founding
partner of the Let's Encrypt project and the non-profit organization that
develops Certbot? We'd like to send you email about our work encrypting the web,
EFF news, campaigns, and ways to support digital freedom.
- - - - - - - - - - - - - - - - - - - - - - - - - - - - - - - - - - - - - - - -
(Y)es/(N)o: N #メーリングリストに加入するか
次に、証明書の取得が実行される。
Congratulations! Your certificate and chain have been saved at:
/etc/letsencrypt/live/example.com/fullchain.pem
Your key file has been saved at:
/etc/letsencrypt/live/example.com/privkey.pem
”Congratulations!”と表示されれば完了。証明書の保存場所は”/etc/letsencrypt/live/example.com(FQDN名)/”になる。
証明書を更新する
Let’s Encryptで作成したサーバー証明書は有効期限が90日なので、定期的に更新をするようcronに設定する。
# crontab -e
毎月1日の3時に更新(左から分、時、日、月、曜日)の場合は
00 03 01 * * /usr/local/bin/certbot-auto renew --deploy-hook "systemctl restart httpd postfix dovecot"
- 更新が実行されるのは30日前からである。
- “–deploy-hook”オプションは、SSL証明書の更新が行われた場合のみ実行する。
- 更新時にはApacheとPostfixとdovecotを再起動させる。
Postfixの設定
main.cfの編集
バックアップ
# cp -p /etc/postfix/main.cf /etc/postfix/main.cf.backup2
# vi /etc/postfix/main.cf #
#行頭に”#”を付けコメント化する
#smtpd_tls_cert_file = /etc/pki/tls/certs/postfix.pem
#smtpd_tls_key_file = /etc/pki/tls/private/postfix.key

#最終行に追記 (証明書は取得した証明書のファイルパスに置き換える)
smtp_tls_security_level = may
smtpd_use_tls = yes
smtp_tls_mandatory_protocols = !SSLv2, !SSLv3
smtpd_tls_mandatory_protocols = !SSLv2, !SSLv3
smtpd_tls_cert_file = /etc/letsencrypt/live/example.com/fullchain.pem
smtpd_tls_key_file = /etc/letsencrypt/live/example.com/privkey.pem
smtpd_tls_session_cache_database = btree:/var/lib/postfix/smtpd_scache
smtpd_tls_session_cache_timeout = 3600s
smtpd_tls_received_header = yes
smtpd_tls_loglevel = 1
smtp_tls_security_level = may
の場合、STARTTLSに対応している送信先サーバにはSTARTTLS通信で、STARTTLSに対応していないサーバには平文で通信する。
master.cfの編集
# cp -p /etc/postfix/master.cf /etc/postfix/master.cf.backup2
# vi /etc/postfix/master.cf
smtpsの有効化
smtps     inet  n       -       n       -       -       smtpd ←行頭の"#"を削除
  -o smtpd_tls_wrappermode=yes ←行頭の"#"を削除
  -o smtpd_sasl_auth_enable=yes ←行頭の"#"を削除
設定ファイルのチェックをし、
# postfix check
エラーが表示されなければ再起動する。
# systemctl restart postfix
Dovecotの設定
10-ssl.confの編集
# cp -p /etc/dovecot/conf.d/10-ssl.conf /etc/dovecot/conf.d/10-ssl.conf.backup2
# vi /etc/dovecot/conf.d/10-ssl.conf
SSL/TLSを有効にする。
ssl = yes
取得したサーバー証明書を指定する。
#行頭に"#"を追加
#ssl_cert = </etc/pki/dovecot/certs/dovecot.pem
#ssl_key = </etc/pki/dovecot/private/dovecot.pem
#取得したサーバー証明書と秘密鍵を指定
ssl_cert = </etc/letsencrypt/live/example.com/fullchain.pem
ssl_key = </etc/letsencrypt/live/example.com/privkey.pem
dovecotの再起動
# systemctl restart dovecot
ファイアウォール設定
ファイアウォールの設定とリロード
# firewall-cmd --add-service={smtps,pop3s,imaps} --permanent
success
# firewall-cmd --reload
success
プロトコル名(ポート番号)
SMTPS(465/tcp)、IMAPS(993/tcp)、POP3S(995/tcp)
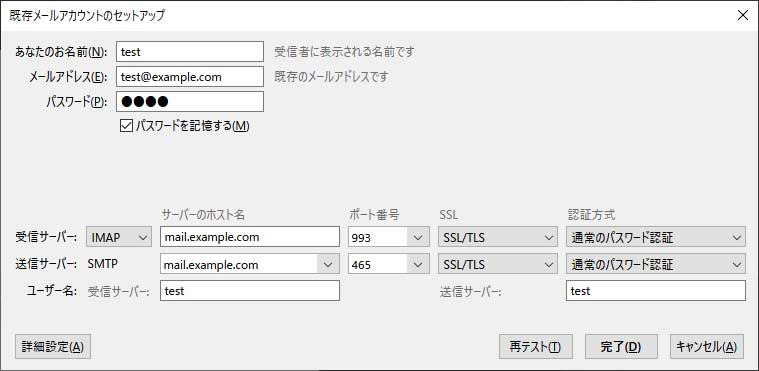
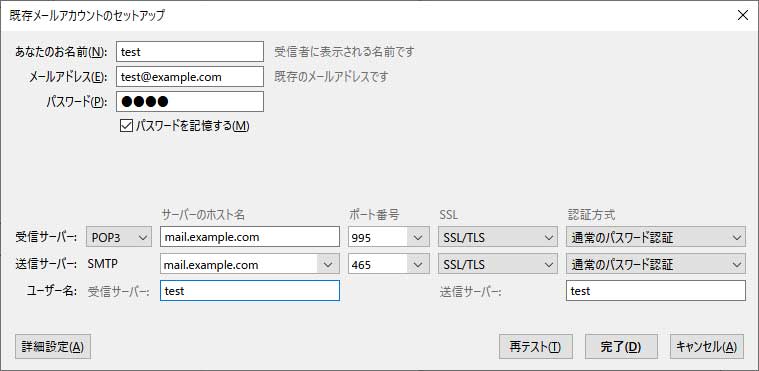
メールソフト設定
メールソフトとしてThunderbirdを使用する。
SMTPSとPOP3Sにする場合
SMTPSとIMAPSにする場合